Setting up an App Registration in Azure – The just make it work edition

What is this?

There are a lot of articles out there on how to setup an App Registration in Azure. Most of them contains a lot of useful information on why, rather than how.

This article is only about the how.

What you need to do

  1. Log into Azure
  2. Find the App Registration page.
  3. Create the App registration
  4. Create the App Secret
  5. Where to find information you will probably need later.

The process

Login to Azure

Come on you know this. Why are you even reading this step?

Find the App Registration Page

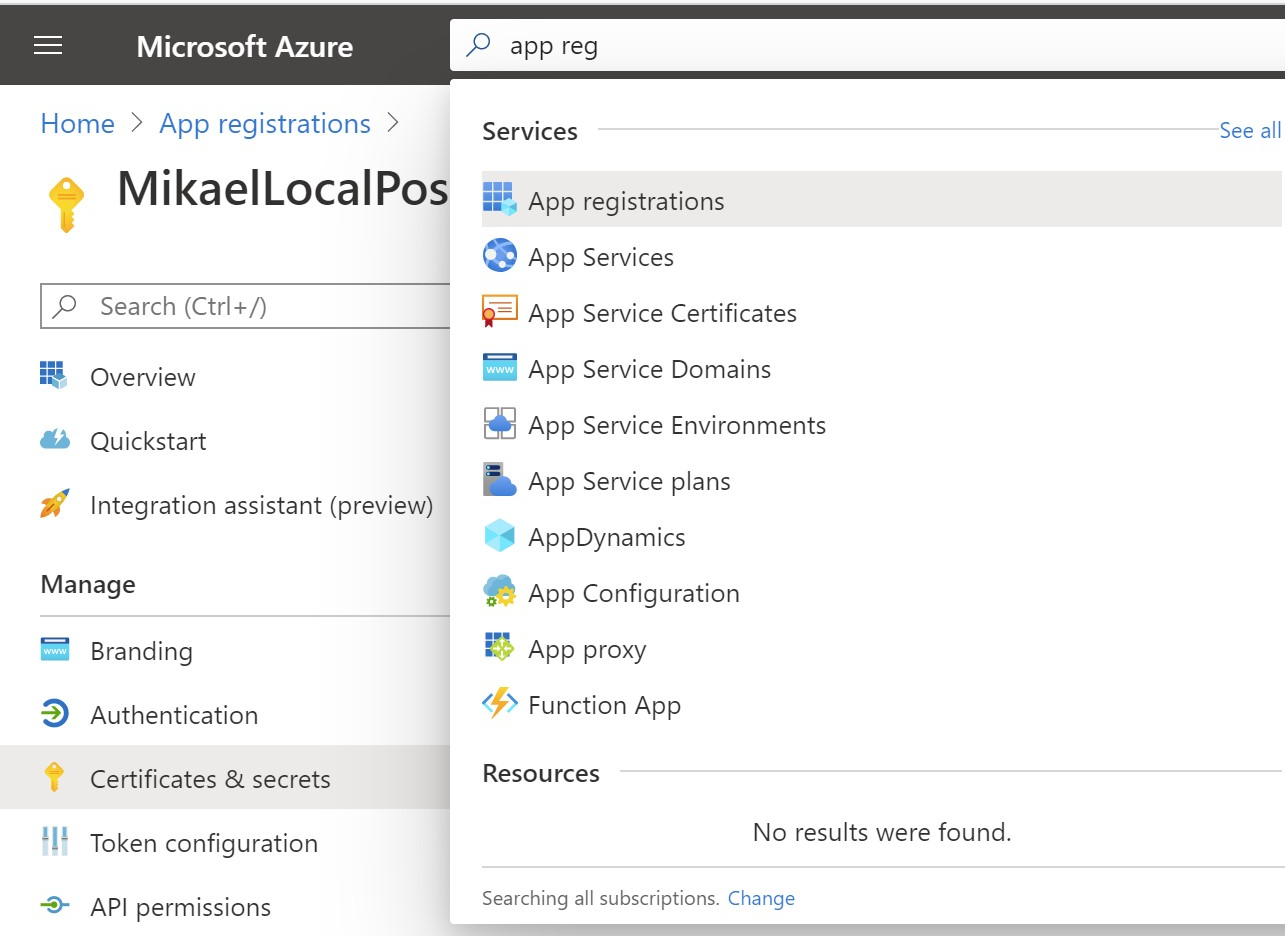
The easiest way of doing this is to use the search field at the top of the page. Just type App Reg and it should pop up.
file
Select it.

Create the App Registration

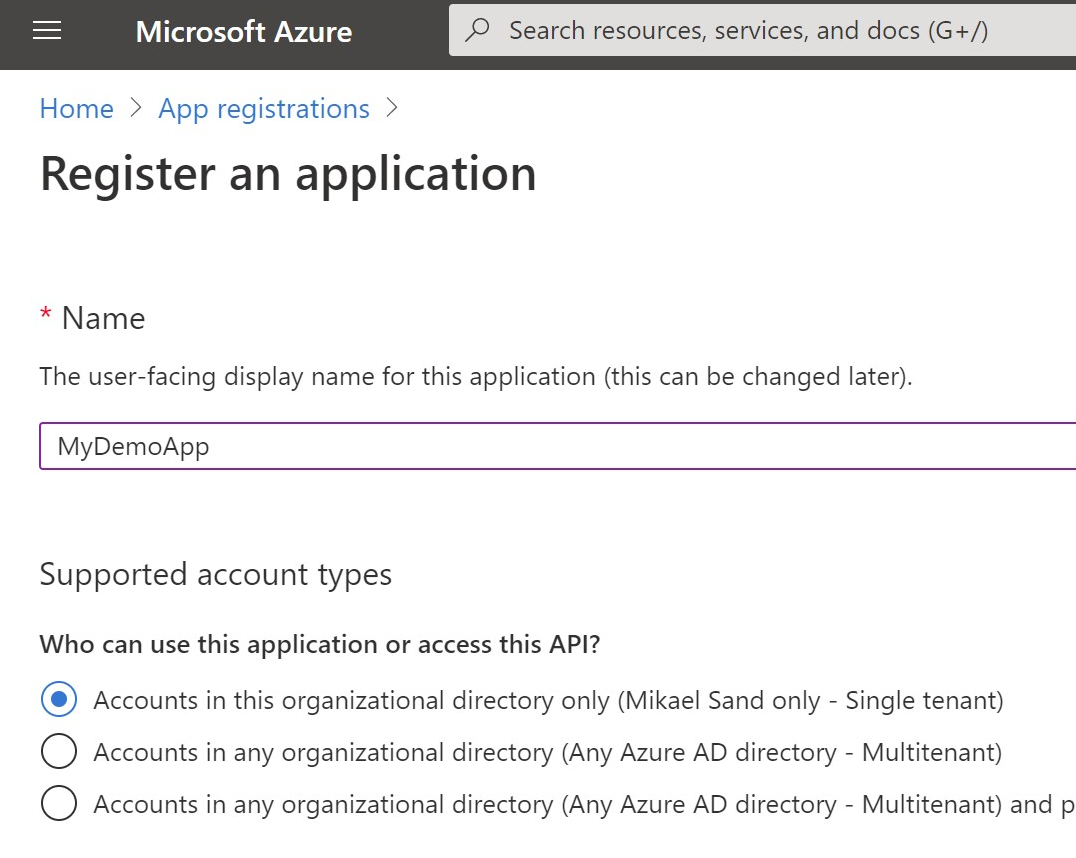
On the start page for App Registration, click New Registration at the top left.

  • Give it a useful name. Better than MyDemoApp
  • Make sure the top radio button is selected.
  • Leave the Redirect URI blank and click the Register Button
    file

Create the App Secret

Remember to store the secret somewhere!!!
When you have registered your app you will be forwarded to its starting page.

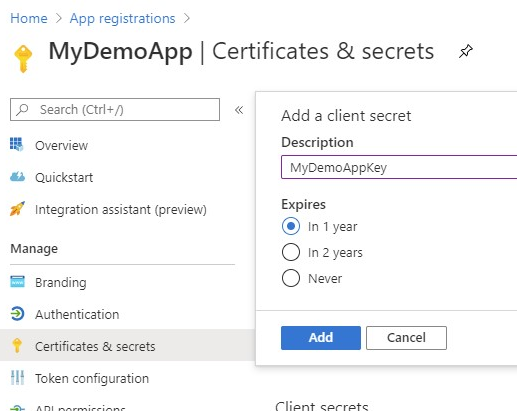
  • In the menu to the left, select Certificates & secrets
  • In the new page, click the New client secret button.
  • Give it a description and expiration (I always use 1 year for test and dev keys) and click Add.
    file
  • Important! Take it slow!
  • Copy the value of the key created. This is the only time it is shown.
    file
  • Store the key for later use.

Where to find information you will probably need later

When using this App to log in or authenticate you will use additional information, beside the Client Secret.

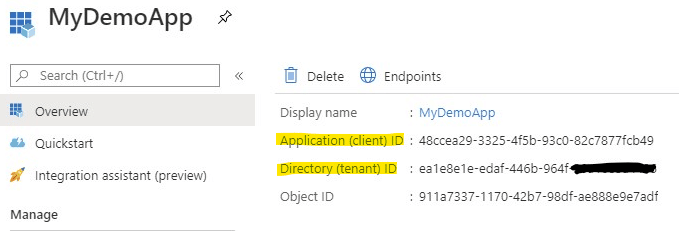
  • Go to the start page for the App Registration and choose your App.
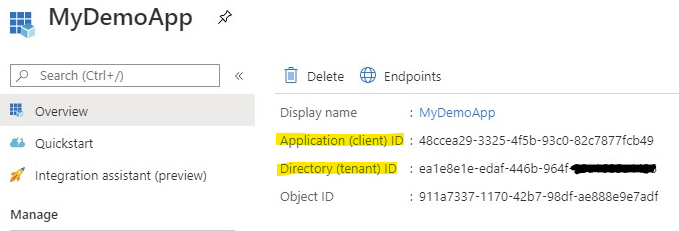
  • In the start page of your app you will find everything you usually need
  • Here you will find the Client ID (under Application (Client) ID) and
  • Tenant ID, which you need to get a token.
    file

YouTube Session on Data center redundancy

The session

I am a co-admin of the Azure Meetup Stockholm group. We usually host sessions on anything Azure related at an office and usually in the evening. Due to the current situation, corona, we decided to move the sessions to YouTube. I did my first session this Monday (1st of June 2020).

The session is on how you can achieve full redundancy between different Azure data centers in the event of an outage, the challenges this poses and a proposed solution. It also contains a fair bit on more hard core computer science, trying to explain why it is impossible to reach 100%.

Session link.

Bob

Strange error when connecting to DataLake using the APIs

This request is not authorized to perform this operation using this permission?! WTF?!

The issue

You are using AAD with OAUTH to access Azure Storage, configured as a DataLake. You get an error that looks like this:

This request is not authorized to perform this operation using this permission.

According to other sites the reason might bee that you have not added your user (or application) to the correct group, or according to others that the storage is configured with a firewall and lastly according to the official documentation it might be a malformed token among other things.

The solution

All those other reasons might be correct but I found another thing: The Datalake resource type is not registered for your subscription. I know, I do not know why you need to do that either but here goes.

The TLDR

Open the subscription on the root level, find resource providers and add Microsoft.DatalakeStore

The full story

The resource is not configured as usable from your subscription and it has to be enabled, or registered. This is the more hardcore way of not allowing certain services to be used in a subscription.

  1. Find the affected subscription. I usually use the menu on the left or search for it in the search-box.
  2. In the left menu of the subscription, scroll down to settings and find the "Resource providers" setting and click it
    file
  3. In the filterbox at the top of the list type datalake and you will get this list.
    file
  4. Select the Microsoft.DatalakeStore option. (Marked #2 in the picture)
  5. Click Register (Marked #3 in the picture). The picture is taken after the registration was done.
  6. Wait, done, retry your API-call.

There might be access issues with registering providers in a subscription. You have to be an Owner or a contributor to do it but the good news is that it only needs to be done once per subscription.

Basic walkthru setup of Azure Front Door with APIm

When I recently setup an Azure Front Door (AFD) I found that there was no good for dummies or just make it work kind of articles, and that is why I write this. That said, if you are looking for more in depth documentation I recommend this page, and if you are looking for an in depth example and setup with APIm you should check out this GitHub repo by Paolo Salvatore.

Finding AFD

The first task is to find Azure Front Door. I usually use the search bar at the top of the page and the select the marketplace option.

Configuring AFD

Basics

First you need to assign or create a resource group for the new AFD. Note that the location is only for the resource group and not the AFD. The ADF service is a global service and as such have no location. That is one of its prime features.

Note The location for my resource group in the picture is not valid. Choose any under Recommended in the dropdown.

Click the Next:Configuration button to continue.

Configuration

When you setup an AFD for the first time, you get a nice Wizard to help you along. Start by clicking the plus-sign under Frontend/Domains.


In this step you need to add a frontend host, which sounds tricky but is really only the web address that the AFD will have once you publish it. This name needs to be globally unique. I have chosen mikaelsandblog so the address will be http://mikaelsandblog.azurefd.net when I publish it.

The other two options are out of scope for this blogpost but they have no effect on what we are trying to do.

Backend pools

This is the second step. Just click the plus-sign again. Here you will add pointers to the APIm instances you want to expose using AFD. The name pool refers to the pool of service endpoints that AFD can pick from to direct an incoming call.

Name

Start by giving the pool a name, like MyAPIms or something. When you do this properly, you might want to use a better name.

Add a backend

Click on the + Add a backend link to get this form

In the dropdown, chose API Management. This populates the form with the APIm instances available to you in your subscriptions, which is awesome! Simply chose the subscription and APIm instance you want, and you would probably also leave the port configuration as they are.

Should you need to point to an instance which is not in the same subscription, you should use the Custom Host Option. Simply add the host FQDN for your APIm instance in the Backend host name field. In my case this is mikaelsand.azure-api.net and leave all the other settings as is.

Priority and weight

If you are looking for the simplest of setups you can skip this part.
In some scenarios these settings are really important. In my case I needed to demonstrate the use of AFD as a failover service. This meant that one APIm instance should always be preferred if it is available. The basic setting for priority and weight points to a round robin pattern where all endpoints are treated equally. In order to make one endpoint be the preferred I simply gave that one the max setting in both, so priority=1 and weight=1000 made sure that one APIm was called as often as possible.

If this is not in the scope of your scenario, just leave the settings as is.

Routing rules

The last step is to setup routing for your AFD. This is very useful if you have several services behind your AFD, but that is not the scope of this post. Simply click the plus sign and review the form.

The settings should be enough to get your first call thru, so simply click Add.

Provisioning

You should now be able to end the configuration of AFD and provision it from Azure. It will not even take a minute.

Testing it out

If you need some tips on how to make sure it works, you can keep reading.
To make sure that everything works as it is supposed to, you can fire up Postman or VS Code. First, try to call your APIm directly to know that everything is working as intended:

The call

GET https://mikaelsand.azure-api.net/echo/resource?param1=sample
Ocp-Apim-Subscription-Key: xyzxyzxyz

The response

HTTP/1.1 200 OK
Cache-Control: no-cache
Pragma: no-cache
Content-Length: 0
Expires: -1
Accept-Encoding: gzip,deflate
Host: echoapi.cloudapp.net
User-Agent: vscode-restclient
ocp-apim-subscription-key: xyzxyzxyz
X-Forwarded-For: 217.208.192.204
X-AspNet-Version: 4.0.30319
X-Powered-By: Azure API Management - http://api.azure.com/,ASP.NET
Date: Thu, 30 Apr 2020 09:06:33 GMT
Connection: close

Then you change the host address in the URI to the host address you assigned earlier. For me I replaced mikaelsand.azure-api.net with mikaelsandblog.azurefd.net. The you call the API once again.

The call

GET https://mikaelsandblog.azurefd.net/echo/resource?param1=sample
Ocp-Apim-Subscription-Key: xyzxyzxyz

The response

HTTP/1.1 200 OK
Cache-Control: no-cache
Pragma: no-cache
Via: 1.1 Azure
Expires: -1
Accept-Encoding: gzip,deflate
Host: echoapi.cloudapp.net
User-Agent: vscode-restclient
ocp-apim-subscription-key: xyzxyzxyz
X-Forwarded-For: 217.208.192.204,147.243.71.16
X-Azure-ClientIP: 217.208.192.204
X-Azure-Ref: 0eZWqXgAAAAArCUZJElgDSJxnlGMAYizAU1RPRURHRTA4MTUAMGYyMTViODAtNjk3OS00YzU3LWIzM2ItOTYyODI3NjZiYjQ5
X-Forwarded-Host: mikaelsandblog.azurefd.net
X-Forwarded-Proto: https
X-Azure-RequestChain: hops=1
X-Azure-SocketIP: 217.208.192.204
X-Azure-FDID: 0f215b80-6979-4c57-b33b-96282766bb49
X-AspNet-Version: 4.0.30319
X-Powered-By: Azure API Management - http://api.azure.com/,ASP.NET
Date: Thu, 30 Apr 2020 09:08:09 GMT
Connection: close
Content-Length: 0

You should get the same answer back, with some additional headers. If you do, everything is working fine.
All those X-headers are set by AFD and can be used for tracking and debugging calls. The sample put up by Paolo examines this.

If you do not have access to any API in the APIm you are trying to call you can always your the status service we used under the health probe section above.

The call

GET https://mikaelsandblog.azurefd.net/status-0123456789ABCDEF

The response

HTTP/1.1 200 Service Operational
Content-Type: application/json
X-Azure-Ref: 0PJqqXgAAAACTmVtpuYfiQqT3XHQhG9jLU1RPRURHRTA4MjIAMGYyMTViODAtNjk3OS00YzU3LWIzM2ItOTYyODI3NjZiYjQ5
Date: Thu, 30 Apr 2020 09:28:28 GMT
Connection: close
Content-Length: 0

In closing

There are a lot of nice and useful features in AFD. I suggest that the next thing you look at are routing rules or custom domains.

If you want to get your teeth into it, I think the best place to start is the AFD FAQ.

Calling APIm consumption SKU from Logic App

There is a problem when you want to call an API hosted in an Azure API management (APIm) instance if it is a consumption SKU.
Getting around it is easy.

The issue

Lets say you need to call a service you have made. That service has to be hosted behind an Azure API management instance. There might be many reasons, but the main one is that the service need to be protected using APIm.

You create a new Logic App and you want use the built in connector for APIm.
file
You find the consumption instance and select it. The API you created shows up in the Logic App.
file
In my case the API is simply calling a dummy Logic App.

You fill what you need in order to connect to the API. In my case I only need a SubscriptionID.
file
You click save and you will get this error:
file

Failed to save Logic App <your name here>. The API Management service hosting the API <pointing to your APIm instance> could not be found

My toughts

I think this is due to how the connector works in Logic Apps. The connector gets its configuration in a different way than how it saves that configuration. An APIm consumption SKU is different from a regular one. It does not have any external IP-address, since it is a shared service. Several consumption instances are probably hosted on the same servers which makes me think that is why the Logic App cannot find it when it saves.

I would consider this a bug, rather than not supported.

The solution

You have to work around the problem and use the ever useful HTTP action. You can always call the API using its DNS name (or address of you prefer).
file