Category: Uncategorized

Access Querystring in Logic App

A quick search of the internet gives you inconsequential results for how to get the querystring in a standard request-response Logic App. Can it be done? Yes! How? Here is how:

The queries object

There is an object called “queries”. This object contains all of the querystring that is sent to the logic app. This is awesome because it means you can use the Logic App without constantly using POST and a body. Sometimes you just want to send a couple of values, like for instance an employee-identifier.

The object is under “triggeroutputs”, so accessing it is easy:

@triggerOutputs()[‘queries’][‘paramname’]

You can either access the value directly or store it in a variable for later use.

If you need to handle null-values, you add a ?-sign where you usually do but omitting that gives you a good way to handle missing values. If your Logic App needs a value to function, you have to make sure it is submitted.

Handling missing values

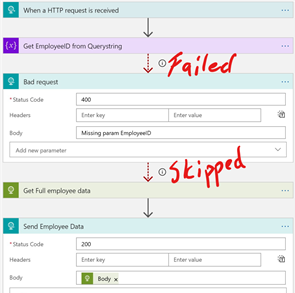
Here is one way of doing it

This will send a HTTP 400 back if the variable cannot be assigned. That way we know, further down that the EmployeeID is set and the backend system can be called correctly.

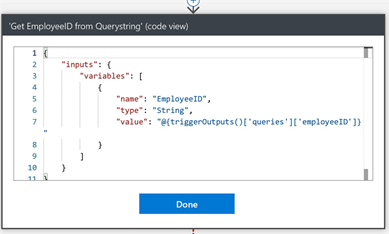
The “Create variable shape” has this code to get the value from the querystring:

Connecting to a PostgreSQL database from Azure

There is an elephant in the room, or at least a logotype with an elephant. The product is called PostgreSQL and is a capable, open source, relational database engine. More info can be found here.

To tame this beast, you can find several ways of hosting it, AWS and Azure both have offerings and you can also choose different packages on the Azure Marketplace for hosting it on its own server. Personally, I always go for the PaaS version of anything.

In this scenario a colleague of mine used the PaaS version, but hosted on AWS, and we needed to connect PowerBI to it, which means using the on premise data gateway, which is a bit of a personal favorite of mine. The setup might seem to have a bit too many moving parts, but the requirements where clear: make the data in this database available to PowerBI.

The setup

From left to right, PowerBi connects to the on premise data gateway (OPGW) server using HTTPs. The gateway server is hosted in Azure and contains the data gateway. The data gateway connects to the PostgreSQL database service on Amazon. The OPGW server is allowed access by configuring the local service firewall and by sending the correct credentials.

The OPGW needs to be updated with binaries to enable connectivity to any PostgreSQL database. It is supported out of the box, it just needs the right binaries to work. Luckily, they are available on GitHub.

Since we are using the OPGW to expose the data to PowerBI, the same OPGW can be used from Logic Apps to access the same database server.

Note that the OPGW server could be placed in Amazon as well, we just didn’t want to.

The steps

Make sure to read ALL these steps before starting. There are some things which might take time and needs to be planned.

Besides the obvious ones of getting a PostgreSQL database, and an Azure VM the steps where as follows:

  1. Install the OPGW on the server.
  2. Download the binaries for enabling connectivity with PostgreSQL from GitHub. At the time of writing the current version is 4.0.3
  3. Install the binaries and restart the OPGW service.
  4. Register the OPGW in the Azure subscription.
  5. Get the settings for the PostgreSQL server from Amazon. The most important setting is called EndPoint and should look like: yourservername.randomkey.datacenterlocation.rds.amazonaws.com
  6. The OPGW does not allow for non encrypted connectivity, like other tools like the popular PostgreSQL administration tool pgAdmin. Since you must encrypt you have to harden your Amazon database using this guide.
  7. You should now be able to connect to your database straight from PowerBI. Make sure you use the right credentials, and data gateway.

Debugging

If you cannot connect you can always press that little button in PowerBI called “Test all connections”. That usually gives you good information. Here are some possible mistakes:

  1. You have submitted the wrong credentials.
  2. The firewall is not configured in Amazon.
  3. The OPGW server is not running.

The error message from PowerBi is usually very helpful and to get more information, try to install pgAdmin on your OPGW server to make sure it can connect to the Amazon database.

Making your design

To make something publishable in PowerBI you have to create it PowerBI Desktop. Here, you can connect to the PostgreSQL database directly without any OPGW servers. These are the steps:

  1. Download and install the binaries from GitHub (steps 2 and 3 above).
  2. Create a systemwide DSN for your Amazon database, using the endpoint and credentials.
  3. Create a new datasource in PowerBI and point to the new DSN.

Happy designing.

How to only poll data on specific weekdays using the WCF-SQL adapter

There are a lot of solutions to this particular question. The need is that we only poll data from a database on Sundays.

This might be solved using a stored procedure that only returns data on Sundays. It might also be solved by using the famous schedule task adapter to schedule the poll for Sundays. You can also do some cool coding thing using a custom pipeline component that rejects data on all other days but Sundays. Your scenario might be very well suited for one of these solutions, the scenario presented by my colleague Henrik Wallenberg did not fit any of those.

The scenario

A database is continuously updated thru out the week but we need the export data from a specific table every Sunday at 6pm. We cannot use the schedule task adapter nor stored procedures. We decided to try to trick BizTalk using the PolledDataAvailableStatement in the WCF-SQL adapter on a receive port. Turns out it works! Here is how.

Please note that this does not work if you cannot use ambient transactions.

According to this post, you must set Use Ambient Transaction = true if you need to us a polledDataAvailableStatement. This seems really odd to me but after receiving feedback about this article I know that it is true.

The solution

  1. Create the receive location and polling statement.
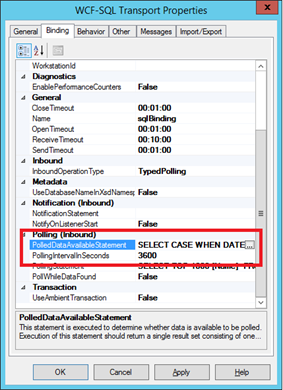
  2. Find the setting PolledDataAvailableStatement
  3. Set it to: SELECT CASE WHEN DATEPART(DW, GETDATE()) = 1 THEN 1 ELSE 0 END
  4. Set the polling interval to 3600 (once an hour).
  5. Apply your settings.
  6. Set the Service Window to only enable the receive location between 6pm and 6:30 pm. 
  7. Now the receive location will only poll once a day and only execute the polling statement on Sundays.

More information

How does this work? It is very simple really. The property PolledDataAvailableStatement (more info here) needs to return a resultset (aka a SELECT). The top leftmost, first if you will, cell of this resultset must be a number. If a positive number is returned, then the pollingstatement will be executed, otherwise not.

The SQL statement uses a SQL built-in function called DATEPART with a parameter value of “dw”, which returns “Day Of Week”. More information here.
Day 1 is by default in SQL Server a Sunday, because Americans treat days and dates in a very awkward way. There might be some tweaking to your statement in order to make Sunday the 7th day of the week. So the statement SELECT CASE WHEN DATEPART(DW, GETDATE()) = 1 THEN '1' ELSE '0' END returns a 1 if it is day 1 (Sunday). This means that the pollingstatement will only be executed of Sundays.

We then set the pollinginterval to only execute once an hour. This, together with the service window, will make sure the statement only executes once a day (at 6pm) as the receive location is not enabled the next hour (7pm). You could update the SQL statement to take the hour of the day into consideration as well but I think it is better to not even execute the statement.

The downside

This is not a very reliable solution though. What if the database was unavailable that one time during the week when data is transported? Then you have to either wait for next week or manually update the PolledDataAvailableStatement to return a 1, make sure the data is transported and then reset the PolledDataAvailableStatement again.

In conclusion

It is a very particular scenario in which this solution is viable and even then it needs to be checked every week. Perhaps you should consider another solution. Thanks to Henrik for making my idea a reality and testing it out. If you want to test it out for yourself, some resources to help you can be found here: InstallApp Script

Flatfiles and repeating tag identifiers

This particular post might not be very “edgy” but rather something to get me going, as well as functioning as a personal “how the h-ll did I do that” for the future.

The problem

A client presented us with a rather standard flatfile. It was about 20 rows long, separated by the ever usual CR LF, and they contained tag identifiers.

The identifiers were numbered 10, 20, 30 and 40 and they could appear in any order, may or may not be present and the records were positional.

Seems easy, right? Well it took me some time and there are a couple of gotchas along the way so I thought I would share them.

The file

Here is a subsection of the file. Notice the repeating identifiers and the difference in length between identical tags.

10000000000004083006019800324E50000John Doe
2500000000000000433       Q00086Jane doe
3000000000000008448H00001Joe Doe
4000000000000008448H00001Hanna Montana
10000000000004083006019800324E50000

The solution

There were three issues that needed to be solved and, again I am not presenting anything new here.

  1. Tag identifiers in positional records.
  2. Repeating tag identifiers.
  3. The last column could be empty or not padded.

I started by adding a flat file schema, adding a root, and setting the Child delimiter Type to Hexadecimal and Child Delimiter to 0xD 0xA, now for the interesting part.

Tag identifiers in positional records

Tag identifiers are simply put, just that: some kind of text at the start of a record that shows what kind of record it is. It is a very useful feature and is often used in mainframe scenarios.

The tag identifiers in the file above are the first two positions. So I added a new child record and set the property Tag identifier to 10, and the Structure to Positional.

I then proceeded to add all the different columns based of the relative length and position.

Moving on I did the same for the other tag-types as well and ended up with a schema looking quite simple and straightforward.

This is when I ran into my first error: The tag is not removed from the row of data when it is used. So all the other positions was offset by two positions and the parser could not find any columns, or rather the rows were too long.

In order to make it work you have to offset the first field by the length of your tag identifier, or add a column at the front to handle the identifier. I opted for the first one and updated the property “Positional Offset” to “2” for the first field in every record.

Repeating identifiers

You may, or may not know this, but XML actually infer some kind of tag order when writing data defined from an XSD. That is why you get an error when you skip a tag that is not MinOccurs: 0.

So how do you handle the fact that some records might repeat later in a file, like the one in question? The answer is to put all the root children in a Choice-node. So I right-clicked the root node and selected to add a Choice Group. I set the property Max Occurs to Unbounded for the choice node, as well as all the other child records. For those I also added Min Occurs: 0

Lastly I added all the child nodes to the Choice Node and now the row types (tags) may be in any order and may occur zero or unbounded times.

The last column may be empty

One very popular way to export data from a mainframe is to make all the rows be of the same length. One very popular length is 80 characters. However, many exporters choose to end the rows when the data ends. So rather then putting in enough white space to reach a total length of 80, a CR LF is inserted and the row is ended.

You might think that simply setting the tag to “Min Occurs: 0” might solve this but you, like I was, would be wrong. The concept is called “Early Termination” and once you know that it is easy.

In order to allow early termination, which is set to false by default, I had to enable it. The property was located at Schema level and is called Allow Early Termination. Once I set that to True, everything worked fine.

Note that if you do not set Min Occurs: 0, the tag will be created but set to null if the row terminates early.

Data: "...Mikael" = <NAME>Mikael</NAME>
 
Data: "..." = <NAME />

In conclusion

The fairly standard way of exporting data from a mainframe to a textfile, should from now  on not really be a problem.