Updated
This blog post was updated on September 10th 2019, with the new functionality added to Azure. It is now possible to share Gateways between Azure Subcriptions.
Purpose
This blog post seeks to fully explain the planning, installation, and maintenance of the On-Premises Data Gateway, by Microsoft, with a focus is on Enterprise Integration usage, and not on other features, like integration with PowerBI.
Out of scope
The post assumes a basic knowledge of the gateway, the technical aspects of how it connects and communicates and how to use it once it is installed.
As it focuses on the enterprise integration using Logic Apps or even Microsoft Flow, the personal edition of the On-Premises data gateway will not be discussed, nor will the workaround for how to run the On-Premises data gateway without an Office 365 subscription or Azure AD as that is considered non-enterprise – more information on how to implement this workaround, can be found here https://docs.microsoft.com/en-us/azure/logic-apps/logic-apps-gateway-install
Gateway Considerations
The OPG makes it easy to connect to on-premises resources like MS SQL server, web services and even the file system. It is a one stop shop for a lot of different services, that could be exposed using custom code but using only one, easily maintained, clustered service. The ease of configuration comes with a price.
These considerations must be taken into account while planning the architecture of a solution that consumes OPG.
Region consideration
As part of the OPG setup to enable enterprise connections with Logic Apps, it must be registered in Azure – which requires to associate OPG to an Azure region. Once registered, only resources deployed in the same region will be able to access the gateway.
As the gateway is registered during the initial setup process, planning is required to make sure the gateway is registered in the same Azure region as the resources that will consume it.
Scenario 1
The OPG service is installed on a server in Europe. The installation registered the OPG in the West Europe Azure region. Any Logic App that plans to consume the OPG must be deployed in the West Europe Azure region.
Scenario 2
The OPG service is on a server in Brazil. The OPG registration is setup in the West US 2 Azure region. Any Logic App that consumes the OPG must be deployed in the West US 2 Azure region.
Note that the actual physical placement of the server the OPG service will be installed on does not matter. Where the OPG is registered is important. For better performance, it is recommended that the Azure region selected is the closest to the physical placement to minimize latency. But that will vary from project to project and will take other factors in consideration.
Azure Subscription considerations
To fully get the benefits of the OPG ease of use, you need an AAD (Azure AD) account. This means the Azure subscription where the OPG will be setup must be linked to an AAD tenant. If you are considering using the OPG, chances are that the organization already has AAD activated. So, simply put: You need a special user in AAD to represent the OPG.
You can have several gateways registered in the same subscription, or several gateways registered in several subscriptions, using either the same or different users, so it is very flexible depending on your needs. A later addition to the feature-set is that registered gateways can be shared between subscriptions. This impacts security boundaries but makes it easier to reuse one installation many times from several different projects/subscriptions.
Installation considerations
You can only install one on premise data gateway service per server. This means that if you want to have several Azure subscriptions, using separate AAD users, pointing to the same data source, you need to install one On-Premises service per subscription, each on a separate server.
You can, however, share On-Premise Gateway registrations between subscriptions. This may have implications on isolation between different environments (Dev, test and production). More on that later.
The same consideration is valid if you need to consume the same data source from different regions in the same subscription, since a registration is only valid for one region.
More information on this is available in the architecture and scenario below.
Gateway pre-requisites
For OPG to be able to connect to Azure, the following pre-requisites must be setup in advance:
- Configure firewall outbound rules
- A valid AAD/Office 365 account.
Also note that some connectors need additional software to be installed, like the NCo 3.0 for the SAP connector or additional code for the PostgreSQL connector.
Firewall outbound rules configuration
Configuring a firewall to allow a service that can avoid firewall changes to work seems counter intuitive, but this configuration helps OPG to function with the best performance
| Port | Direction | Reason |
|---|---|---|
| 80 | Outbound | Only used to download the installer |
| 443 | Outbound | Used to communicate with the Azure Relay, Azure Login and much more. |
| 5671-5672 | Outbound | Used in AMQP scenarios |
| 9350-9354 | Outbound | Used to communicate with the Azure Relay over TCP. Used as default |
For some networks, the firewall might already be open on port 80 and 443. The gateway needs some additional ports to function as efficiently as possible; 5671 and 5672 as well as 9350 to 9354.
The page on what ports to open and for which domains is located here: https://docs.microsoft.com/en-us/azure/analysis-services/analysis-services-gateway#a-nameports-aports This list assumes your firewall supports DNS. If it does not, you need to open the ports for all the IP-addresses in the Azure region you will register the On-Premises data gateway. The list can be downloaded here: https://www.microsoft.com/en-us/download/details.aspx?id=41653
Note! This IP-list is updated every week, so you need to make sure your firewall is updated accordingly.
The other way of limiting the impact of the gateway on the firewall is to force the gateway to use HTTPs and not use direct TCP. There is a setting in the gateway application for this. The upside is that you only need port 443 to be opened. The downside is that the performance of the gateway may be greatly reduced.
Note! If you enable this, you do not have to worry about other ports, besides 443.
AAD or O365 account
Depending on your needs, you might need more than one account. The important thing to remember is to have at least one account per subscription. It is possible to have the same account for several subscriptions, but the isolation of different account for production and non-productions, calls for at least two.
The new account must be part of the Contributor Role for the subscription you will use it in. This is only needed during the installation and registration process. After that step, the account can be downgraded.
The account should be treated as a service-account and if you can exclude it from password changing policies, be sure to do that. Create a very secure password to mitigate the risk of the password policy exclusion.
Gateway Clustering
There are a lot of features in the On-Premises data gateway, but one needs to be understood in order to plan the architecture: clustering.
The gateway service supports clustering, not the classic Windows cluster, but a cluster of services that can talk to one another. When you install a service on a server, you are creating a single point of failure. This means that if that server is lost, the integration is lost. Even a restart might impact your integration capabilities and availability. To support a 24/7-scenario you need to mitigate this risk.
When planning for enterprise use of the On-Premises data gateway, you must consider using two separate servers for the On-Premises part of the On-Premises data gateway. The details on how to install the gateway as a cluster will be explained below.
Enterprise level architecture
The On-Premises data gateway is a very good fit for small businesses and individual developers and accounts, but the demands of scaling to the enterprise level makes planning the installation key to success. This article sets up an architecture that, might be a common scenario.
The solution architecture for traditional enterprise level isolation
The company Contoso is aiming to leverage Azure for exposing SAP data to the cloud and its more cloud centric vendors and customers. Contoso has been running SAP as its main ERP for years and do not feel the need to move into the cloud, at least for now.
Contoso is using a very traditional division between different environments: a fully isolated production environment, maintained mainly by IT professionals and SAP administrators. The next layer is a test environment, used by both developers to do system tests but also integration testing. The last layer is the dev environment, which is used by SAP developers and some limited testing.
Contoso want to have the same division of responsibility in Azure and that results in three different subscriptions: dev 1, dev/test and prod. The dev 1 subscription could potentially be replaced by other subscriptions or there might be new dev subscriptions added later. The dev/test subscription is to be used by both developers doing system tests, and testers doing integration tests. The solution must be able to shift back and forth between the SAP DEV and SAP TEST environments, depending on the type of testing to be done.
This results in the following setup:
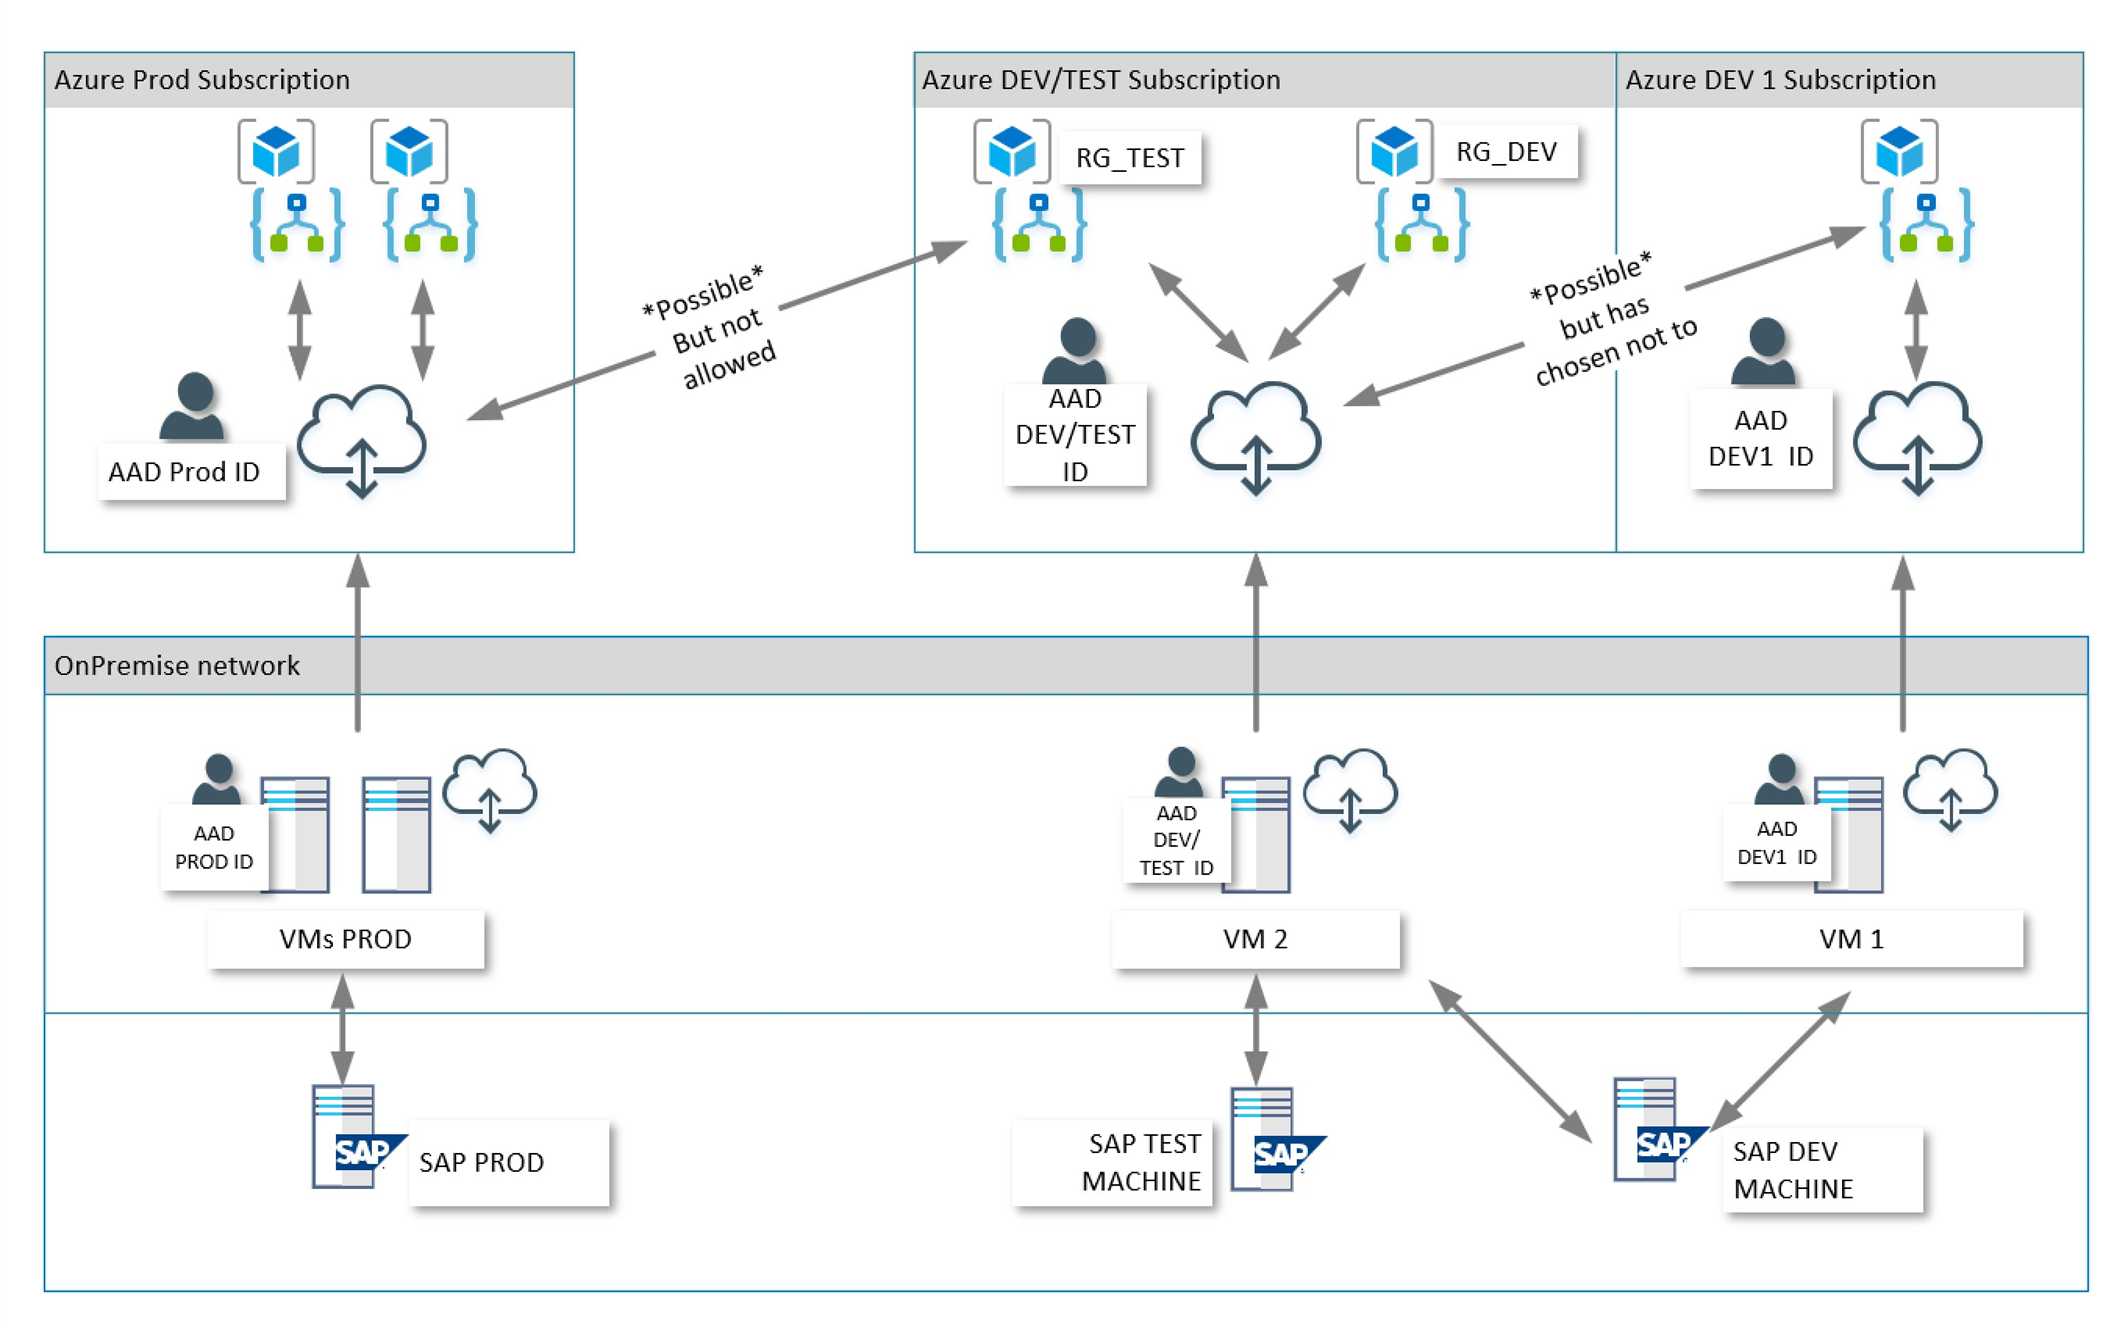
The drawing shows the three different environments: prod, test/dev and dev and how they connect to the different SAP environments.
Production
Looking at the production side, to the left, there is one AAD account for production. This account is also used on the two production servers to register the same gateway on two servers, making that gateway clustered. The gateway registration in Azure can be accessed by several Logic Apps, if they are in the same region. Contoso has chosen North Europe as their main location and therefore the gateway is registered there.
Test/Dev
This environment is in North Europe as well. The subscription has its own AAD account but the difference here is that the account is used twice, on two separate On-Premises servers. This is because Contoso wants separation between test/dev and development environments.
The gateway could be installed on one server and then point to either the SAP TEST machine or the SAP DEV machine. The Contoso policy on separation of environments does not allow this, so a separate machine is needed to be able to point to SAP DEV from the dev/test environment.
This gives two different gateway registrations in Azure, which makes it easy to find what gateway to use and makes it easier to be sure the right SAP environment is accessed.
Dev 1
This is the first, of possibly several development subscriptions. It is in another region, and even if the Contoso SAP servers is in northern Europe, the developer has chosen to register the gateway in West US 2. The gateway service is still installed at the same On-Premises datacenter as the others, illustrating the flexibility of the gateway registration.
The AAD account is unique to the subscription. It could potentially be used by all Logic Apps in the same subscription and region. However, should another dev subscription be set up, that cannot use the same gateway installation, but the AAD account could be reused. The ADD account could basically be the same for all development subscriptions.
The solution architecture for minimal installation
The company Fabrikam is moving quickly in the cloud space. Being able to shift focus quickly is important. They wanted a “fix all” solution with a minimum of implementation effort. They are using three different environments for SAP On-Premise and connected the gateway during development.
Basically, they wanted minimal effort, despite the risks.
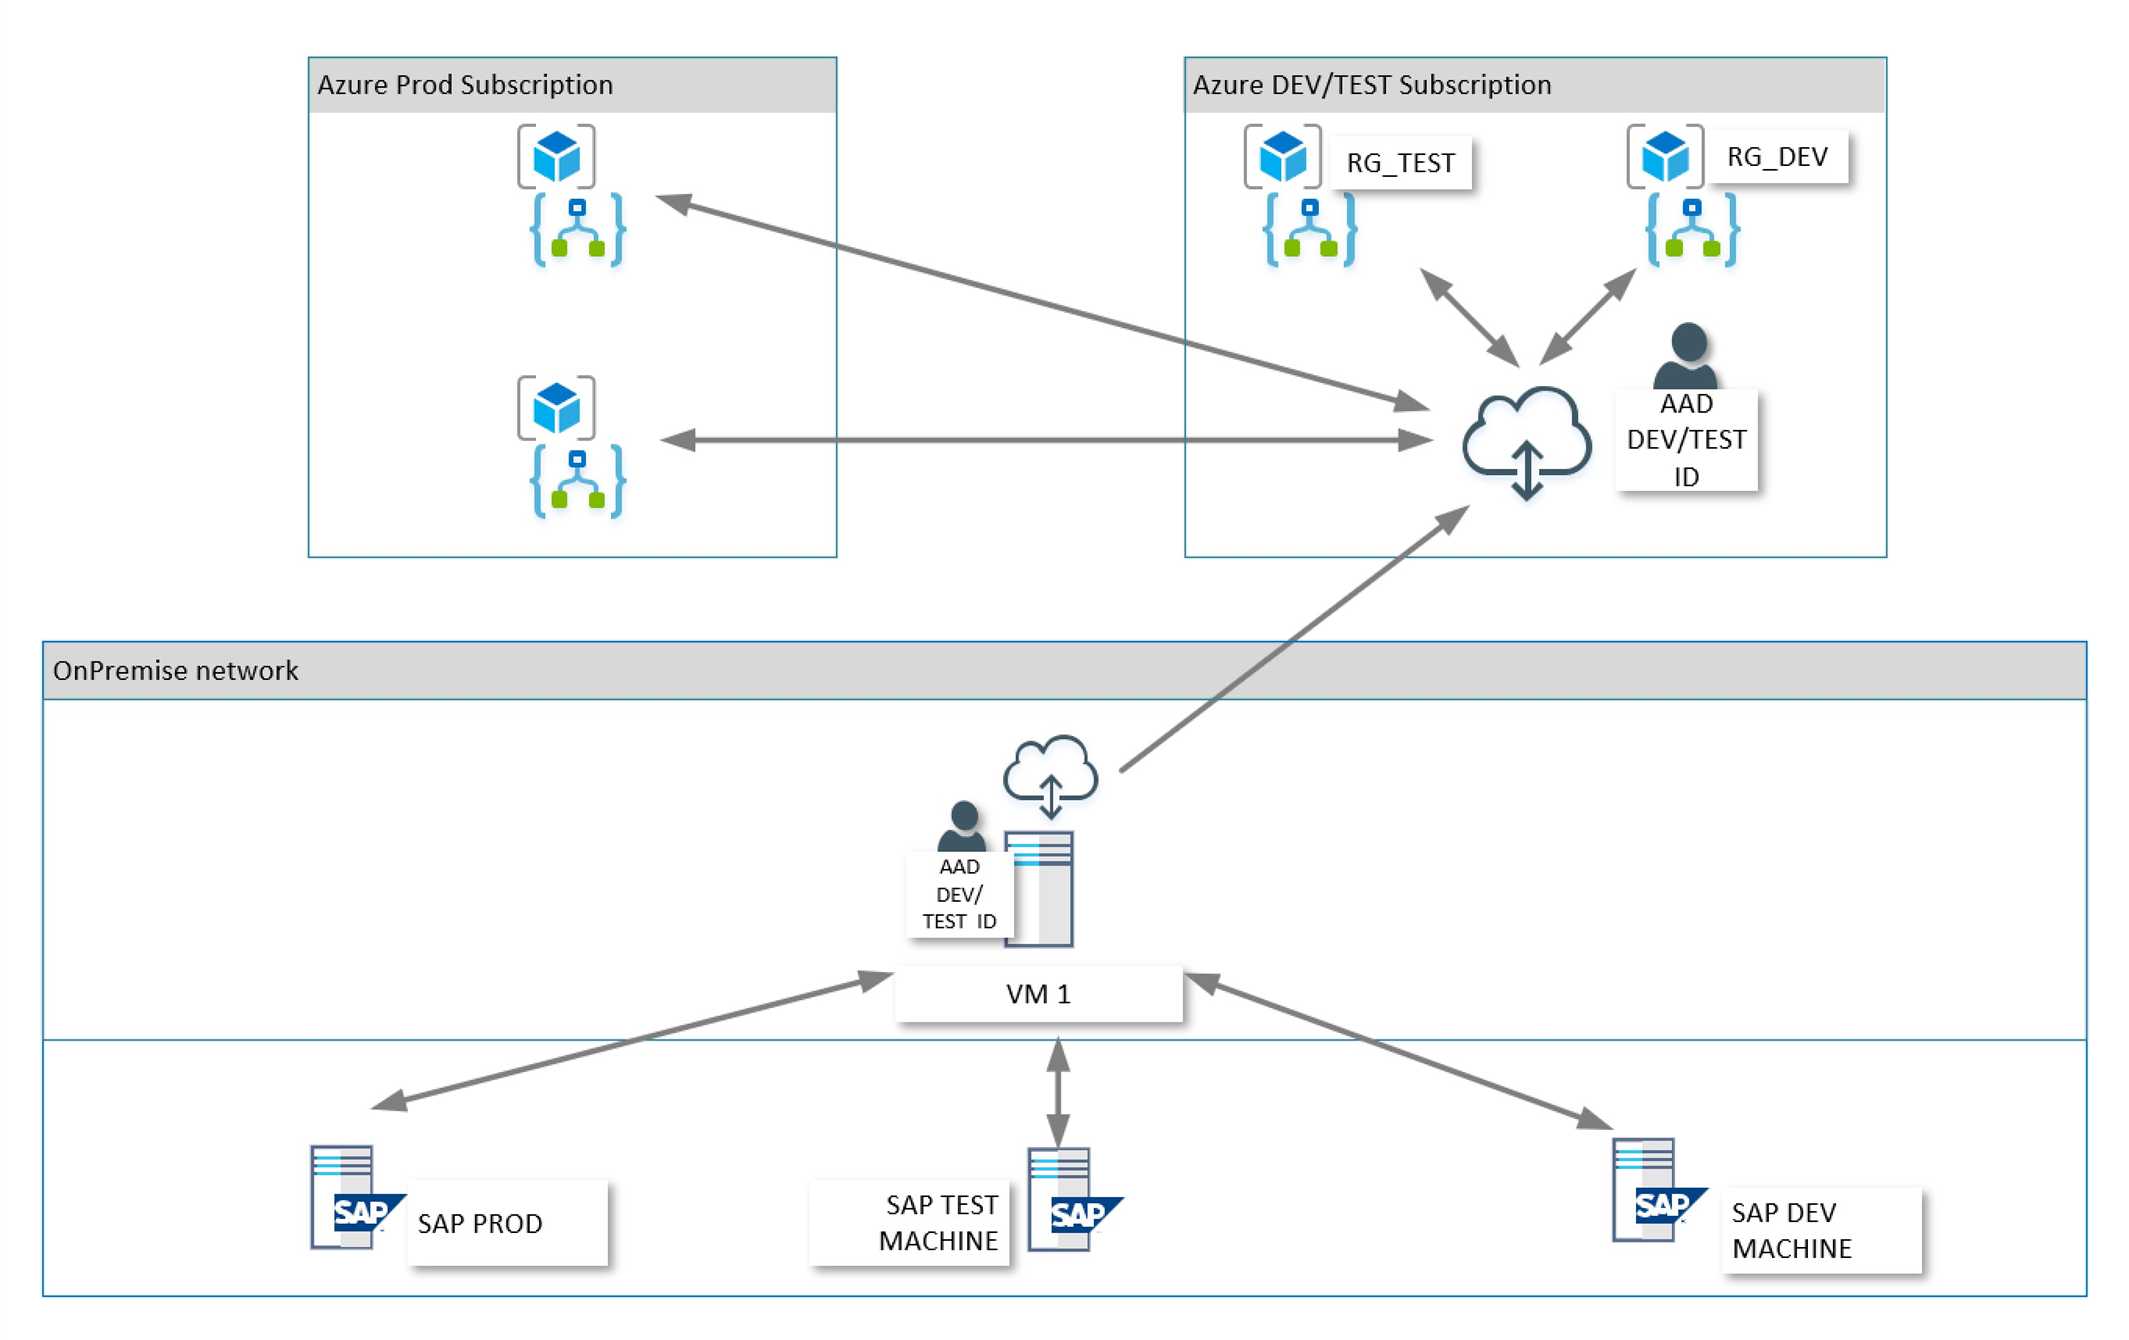
VM1 in OnPremise network
The OPG service is installed on this, one, server. It can be used by its corresponding OPG registration in Azure. The service on VM1 is able to reach all implementations of SAP.
OPG registration in Azure
This is installed using an AAD account. The registration can be reached from all Logic Apps independent from which environment should be used. The registration has been done in the DEV/TEST subscription but could just as well be installed in production, and the used from Logic Apps in TEST/DEV as well.
Security
The OPG registration should probably be moved to production, where a more stringent rule system could stop people from accidentally changing or deleting it.
The different SAP environments have different addresses and username/password combinations, so even if the production environment can be reached from the development area, the developer still needs the right credentials.
The solution for the recommended minimal installation
There is a lot of flexibility in how the OPG can be installed and configured. Taking both the scenarios into account, and finding a minimal, viable solution we arrive at this:
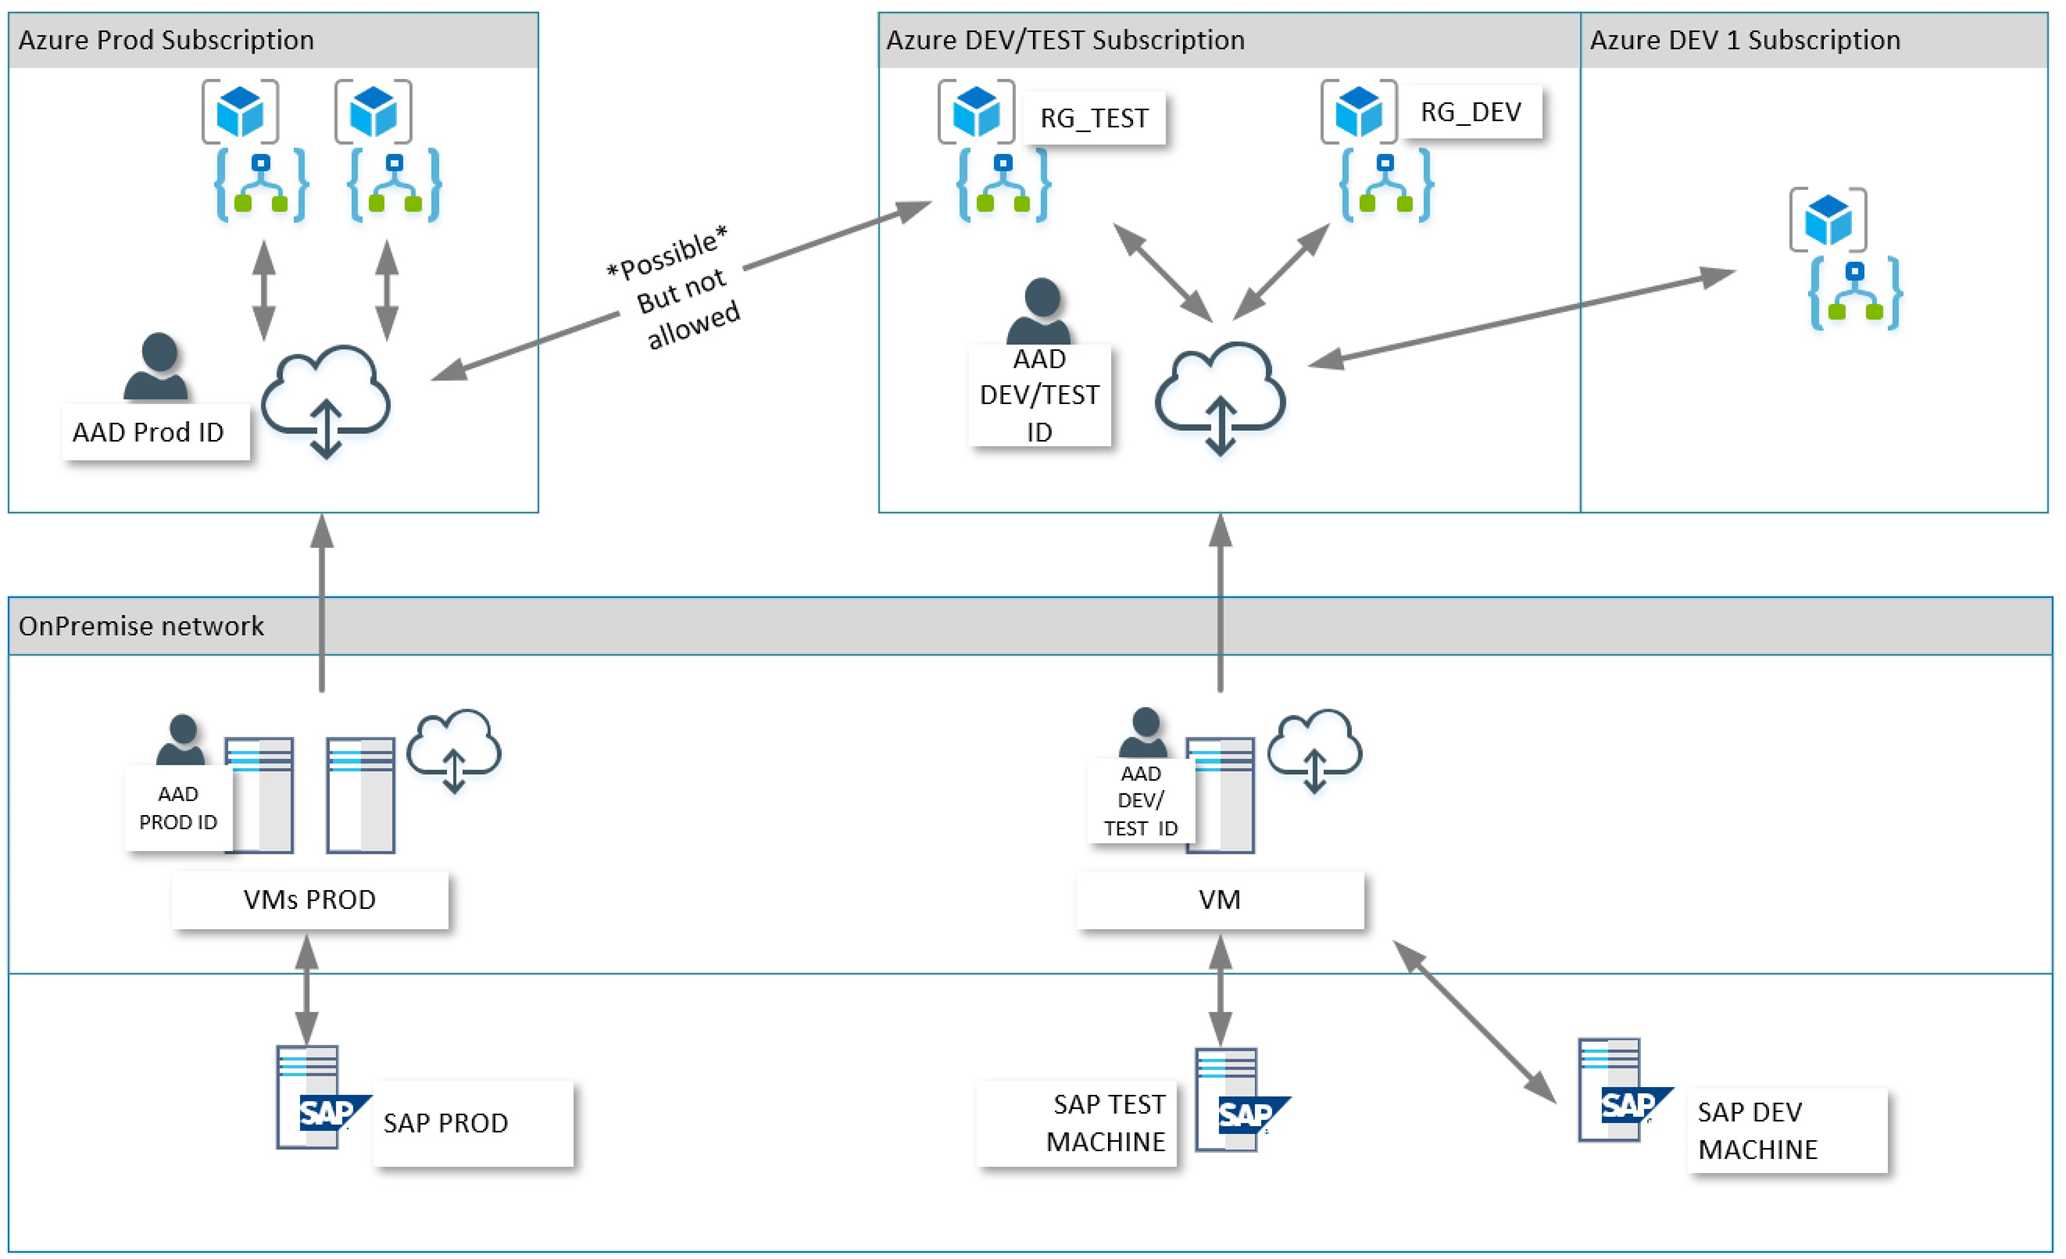
Division between DEV/TEST and Production
The most notable difference between this solution and the minimal one is a clear division between DEV/TEST and production. Even though the ability to use one gateway registration over subscription boundaries, the distinction between production and non-production should always be a priority.
Achieving this division is done by:
Install the OPG service on separate servers
Using this strategy, a division of network related boundaries can be respected.
Register the installations using different AAD accounts
Using different users for production and non-production systems is just a very good habit.
Isolating the OPG server
This is usually a good thing. If the server can be isolated using a firewall or routing, that should be done. This is usually something the integrator has no power over.
Clustering
This is optional, but the SLA for an integration platform is only as good as the cumulative of its parts. If the GW server is down, or needs to be patched, all integrations using the OPG server is also down. The simple cluster solution of OPG is light weight and easy to use.
Planning the installation
In either scenario above, there are quite a lot of activities that needs to be completed. This is a list of all the activities in, somewhat, chronological order. Add or remove activities based on your scenario.
Activities
| Activity |
|---|
| Create an AAD account for development |
| Create a user in SAP for the integrations. Make sure the user has access rights. |
| Make an On-Premises server available for installation |
| Make sure the installing technician has proper access rights to install the OnPremise Data gateway service. |
| Request opening the firewall for 443, and ideally the other ports as well to the Azure region of choice. |
| Make sure the On-Premises server can access the On-Premises resources, in this case SAP. Test using PowerShell. |
| Install the OnPremise Data gateway in the On-Premises server |
| Configure the OnPremise data gateway |
| Register the OnPremise data gateway in Azure, using the AAD account. |
| Test the OnPremise data gateway from Azure using a Logic App and the file system connector. |
| Test the OnPremise data gateway from Azure and connect to SAP Dev. |
| Redo all activities for test if you have a separate environment for it |
| Redo all activities for production. Optionally make sure production uses at least two servers to enable clustering. |
| Install the OnPremise data gateway on the primary production server. |
| Install the OnPremise data gateway on the secondary production server, making sure the installation makes it a part of a cluster. |
Installing the On-Premises data gateway
Installing the On-Premises service
This documentation is based on the actual Microsoft documentation, located at https://docs.microsoft.com/en-us/azure/logic-apps/logic-apps-gateway-install#install-the-data-gateway.
The installation step by step
- Gather information. Make sure you have:
- Login information for the On-Premises server.
- The login information for the AAD used to register the gateway in Azure.
- Login to the server and download the latest version of the gateway at https://go.microsoft.com/fwlink/?LinkID=820931&clcid=0x409
- Remember to “Unblock” the downloaded file.
- Choose the default installation path, click accept and then Install
- Fill in the AAD account in the textbox and click Sign in.
- After sign in you need to name your gateway. This is the name it will have in Azure.
Also, you need to set a recovery key. This is used for recovering a gateway, should you lose the installation or server. Make sure you store this key safely. - Important! Do not forget to update or change the region! Click the “Change region” link at the botton.
- Choose the Azure region that you want to register the gateway in. Click Done.
- Now you are ready to register so click the configure button. When the configuration is done the window should look like this

The other tabs (Status, Service settings, Diagnostics, Network) can be left as is for now.
Registering the Gateway in Azure
After installing and configuring the On-Premises data gateway, you need to log into the Azure portal to register the gateway. This is for security and ease of use reasons. The On-Premises gateway has registered an endpoint in Azure, but to be able to access this endpoint you must register it in your Azure subscription, to make sure the endpoint can only be accessed from the right subscription.
- Login to the Azure Portal using the AAD account you used to register the gateway.
- Find the symbol for “On-Premises data gateways”. You may need to use the “All services” menu option in the menu to the left. Just click that, and search for “On-Premises”, then select it.
- On the page where the available gateways are listed, click Add.
- The blade should autofill. If not, try changing the region. Azure will find its registrations and populate the “Installation Name” dropdown.
- Fill in the required properties. The name of the resource could reflect the name of the On-Premises gateway installation. That is a good way of matching the On-Premises installation with the Azure registration.
- Click Create.
- To test if the gateway is available, log in as a Logic App developer, find the “On-Premises gateways”-list and look for it there.
Installing a clustered instance
By simply installing a single instance of an On-Premises gateway service, you potentially create a single point of failure. One way to mitigate that is to install a secondary instance and have that be a part of a cluster.
- Login to the other On-Premises server.
- Download the same installation program as before.
- Install it the same way as before.
- Sign into the gateway using the same account as before.
- Give the installation the same name (not needed for functionality)
- Tick the “Add to an existing gateway cluster” box.
- Choose your previous installed gateway in the dropdown.
Note! If the dropdown does not populate, make sure you have chosen the same Azure region as the last installation. - Click configure and wait.
Uninstalling the On-Premises data gateway
Since the gateway consists of two parts, the on-premise service and the registration in Azure uninstalling the gateway consists of two steps.
Uninstall the service
The easiest way of doing this is to simply use the Remove programs feature in Windows control panel.
- Open the Control panel.
- Choose “Uninstall a program”.
- Right-click “On-premises data gateway” and chose “Uninstall”.
- Repeat for every clustered instance.
Unregister/Delete the Azure registration
Method 1 – PowerBI.com
You can delete the registration directly from the portal
- Log into the Azure Portal using your gateway O365 account.
- Find the gateway and bring up the overview blade.
- Click delete right at the top left of the blade.
- Fill in the name of the gateway
- Click Delete.
Delete the Gateway cluster registration in Azure
Behind every Gateway registration there is something called a cluster registration, as a gateway is always part of a cluster. To delete the cluster registration, you can only use the PowerBI portal and only delete registrations in the default region of the user.
- Go to PowerBI.com
- Login using the Gateway AAD user
- In the upper right corner, click the settings option, and choose “Manage Gateways”.
- In the list to the left, click the three dots next to the cluster you want to remove.
- In the popup menu, click remove.
If the gateway cluster does not show up in the list, the gateway was installed a region that is not the default for the user.
Method 2 – Via Power Platform portal
Some time after I worte this, Microsoft added the ability to handle gateways as a part of the powerplatform. You can use that portal to manage all your platforms within you organization. Visit https://admin.powerplatform.microsoft.com/ext/DataGateways and turn on Tenant administration for gateways in the upper right corner.
Gateway settings and how to use them
If you start the gateway interface, you can easily access four different settings-tabs.
Status
Here you can see if you service is running, and if you log in you can see additional information from Azure.
Service Settings
Here you can restart the gateway, if you do not want to use the services.msc interface or use “net-stop” from the command line.
You can also change the local user account for the gateway. This is usually not necessary as that account only accesses local resources. That account is not used to access external resources, like an SQL server for instance. Those credentials are sent from Azure.
For more information on this account visit this page: https://docs.microsoft.com/en-us/azure/logic-apps/logic-apps-gateway-install#windows-service-account
Diagnostics
You can make the gateway turn on verbose logging by using the slide-control and the restart the gateway service. This logging option takes up a lot of space and should not be used as default.
You can also export the logs, that will make the gateway create a zipfile with all the logs.
Logs
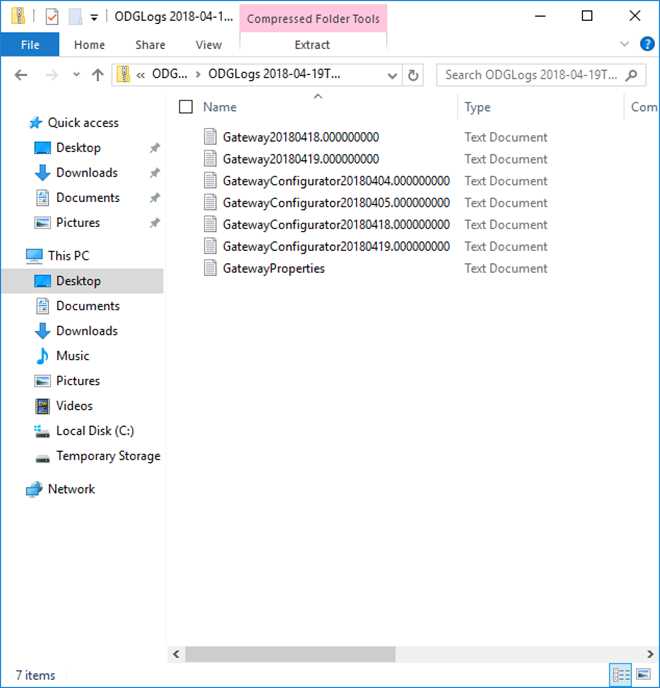
Looking at the logs from this picture. There are three separate logs. The first two files are activity logs. Usually filled with information about the connection pool being cleaned. If you want to debug connectivity issues, this is the log to look in.
The next four files are configuration logs. If you are having trouble during startup of the service, these logs might provide you with useful information.
The last file is a list of properties, like the actual relay endpoint and the gateway guid.
Network
This is a very good place to solve connectivity issues.
The first information tells you if you are connected or not. This is usually “Connected”. If not you might have firewall issues. Click “Check now” to make sure if you are disconnected.
If you have connection issues, or if you need to, you can also turn on HTTPs mode. The reason for this, and the drawbacks are listed under “Open the firewall” above. If you turn on HTTPs mode, you need to restart the gateway service. If the gateway connects after you turn on HTTPs mode, the firewall is only opened for port 443.
If it still does not connect, make sure you actually have an open firewall by executing these PowerShell commands:
Test-NetConnection -ComputerName watchdog.servicebus.windows.net -Port 9350
Test-NetConnection -ComputerName watchdog.servicebus.windows.net -Port 443
If both return TcpTestSucceeded : false, you have firewall-related issues. More information can be found here: https://docs.microsoft.com/en-us/power-bi/service-gateway-onprem-tshoot#firewall-or-proxy
Monitoring etc
The OPG service has performance counters that can be monitored. More information can be found here: https://docs.microsoft.com/en-us/data-integration/gateway/service-gateway-performance#performance-counters
This is very focused on SQL server and OLEDB but the most important metric is CPU usage and memory usage. Make sure they do not spike. Having the CPU run up to 100%, or seeing a high memory usage, when using the OPG service, might point to either badly designed integrations, or the server being too small.
Making sure the service can auto-restart after a server restart and monitor the service status is also key.
 There is an elephant in the room, or at least a logotype with an elephant. The product is called PostgreSQL and is a capable, open source, relational database engine. More info can be found
