Why?
You can use the built in authentication when calling, for example, external APIs. It is one of the best features of Logic Apps. Sometimes you might need to get the auth token anyway. Such as when you think Logic Apps does not support OAUTH 2.0 (Thank you Mötz Jensen for helping me understand it.)
How?
You need to get the usual things: Client ID, Client Secret and audience, or scope depending on the version of OAUTH you need to use. For version 2.0 you need to use scope. Please replace scope with audience in the examples below.
In my example I will use the following settings (pseudo-real):
| Property | Value |
|---|---|
| Client ID | 0352cf0f-2e7a-4aee-801d-7f27f8344c77 |
| Client Secret | Th15154S3cr32t! |
| Scope | https://api.myhome.com/.default |
| Tenant ID | a2c10435-de68-4994-99b2-13fed13bdadf |
Configuring a call
Create a Logic app HTTP step and set the following properties:
| Property | Setting |
|---|---|
| Method | POST |
| URI | https://login.microsoftonline.com/tenantID/oauth2/v2.0/token |
| Headers | |
| Key | Value |
Content-type |
application/x-www-form-urlencoded |
The body is a bit more tricky. You need to create a URL-string with login info. It is not that hard. Just type the property name, set a = sign and the add the property value. Inbetween properties you put a & sign (like a URL).
Using my values from above, the resulting string will look like this:
Client_Id=0352cf0f-2e7a-4aee-801d-7f27f8344c77&Client_Secret=Th15154S3cr32t!&grant_type=client_credentials&scope=https://api.myhome.com/.default
Remember to add the grant_type=client_credentials and you must not use any line breaks. It is just a long string.
Result
Looking at this in logic apps, the step looks like this:

Using the token
To use the token in a call you need to do two things.
- Get the token value from the output of the
Get Tokenstep. - Add the token as a header to the call you need to make.
Get the token value
To make things easy I used a Parse JSON step and provided this schema:
{
    "properties": {
        "access_token": {
            "type": "string"
        },
        "expires_in": {
            "type": "integer"
        },
        "ext_expires_in": {
            "type": "integer"
        },
        "token_type": {
            "type": "string"
        }
    },
    "type": "object"
}
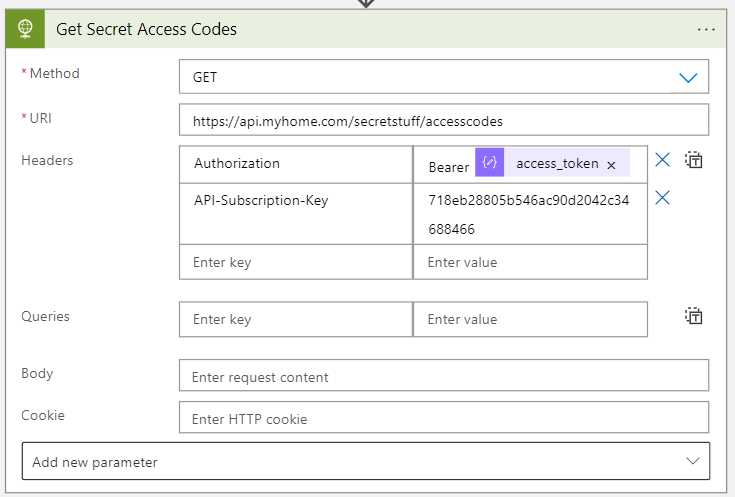
Use the token value
In this case I am calling an API that expects an OAUTH 2.0 token. I configured the step like this:
The short-short version
Issue a call to your AAD using an application/x-www-form-urlencoded body. Making sure the body is one long URL-encoded string.